Sunday, April 13, 2008

Lesson 10 - Using Display Key Ticks, Copying and Pasting Keys on Timeline

Using Display Key Ticks, Copying and Pasting Keys on Timeline
It can isolate the view of the keys to whatever we have selected in the channel box. By doing things like offset in the animation and really tweeking them to give appealing looks.

Note: Its very useful when it comes to modify animation.


Select the Ship to disply the keys on the time line.


Right click on the time line to get the menu and click 'Dislplay Key Ticks' and from the option box and select 'From Channel Box'.

or..


Go to the Animation Preference box(located in the right hand corner) and go to Timeline > Key Ticks > Channel Box.


You can see that when you select the ship you can't see the keys on the timeline.


If you wanted to see the keys, we have to go channel box (cause we mentioned from Channel box in the option) and and select the 'keyed attribute', Notice as soon as we selected we are able to see the keys on the timeline.


If we have to copy the keyframe of 23 and paste it on Frame 14, then Hold the 'SHIFT' and Select the keyframe.


'Right click' on the timeline and select 'Copy' from the menu.


PASTE: Basically it paste the same value

PASTE CONNECT: It essentially going to keep the flow of our animation, so we won’t get the same value of Frame 23, It basically set a Key based on the default tendency.


So now we have copied 'Frame 23' and 'Pasted' on Frame 14, (we did'nt use 'Paste Connect') so the value of 'Rotate X' is same on 'Frame 14'.

Note: You Can't copy and Paste 'Multiple Keys'.

ROUGH TEST

Lets say we have to copy and paste two keys.

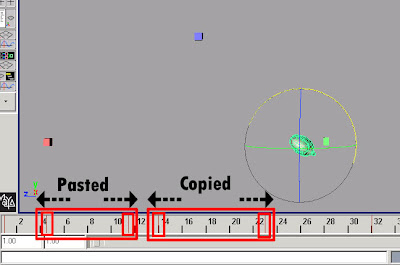
Just select the two keys, here i have Selected 'Frame 14' and 'Frame 23', but i have selected some more extra frames before and after like from 'Frame 12' to 'Frame 24'. So now 'right click' and say 'Copy'.


And here i have selected 'Frame 3' to 'Frame 12', and say 'Paste'. It does'nt matter how long you drag or it does'nt have to be on the same distance.


Its going to paste based of the Frames we have selected.

Here you can see the spacing between those two key sets, it paste according to the selection we made.

If you want to paste the same Frames the one we copied then we have to select the same number of Frames to paste.

(Ex: 'Copy' 10 frame, and select 10 frame and 'paste it' and we get the same distance)



Lesson 9 - Middle Mouse Button Dragging on the Timeline


If you Move your mouse by holding the Middle button on the timeline the object doesn't move, notice that. Only the cursor moves.


Notice, Even if we move our cursor towards right (with middle mouse button) the value and the animation remains the same.


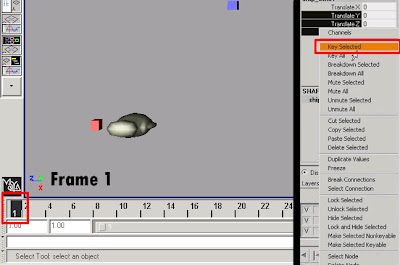
Move the cursor (by holding middle mouse button) to Frame no. 10 (or any no.) and select the 'translate Y', set the 'Key Selected', As you can see the Key has been set on 'frame 10' with the value of 'O'. What it does is it just copy the value from one place to another.


Notice on Frame 1 the 'translate Y' is '0', and on Frame 10 the value of 'Y' is still '0'.


Note: You can use this feature for 'Moving Hold' in animation.

Lesson 8 - Manipulate Keyframe on the Timeline


If u want to move the 'Key' on the time line. By moving the cursor to left and right does'nt help.


'Hold the Shift' and 'press the left mouse button' on the time line, You can see a 'red box' instead of the cursor. and you can see a yellow line instead of a red line on the keyframe, it tell us that the Key is now the part of the selection.


Now we can able to move the key anywhere we want.


If you want to Deselect, click anywhere on the timeline.


If you want to Scale the key frames..(not the value), Say we want to select two keys and scale it to the right side. 'Shift' + 'Click' and bring the red box and drag it towards the right, still holding the shift.


Now we selected the keys (even we can see yellow bar instead of red on the Key), we can move the Selected are by moving right or left.
NOTE: you have to hold the 'two arrow' in the middle to move. You can see the Key position is moving too.


If we need to Scale our Keys, then you should click the outer arrows and drag towares right or left to Scale the keys, notice the keys changing place on 1 and 2.


After you Scaled the keys and deselect it, You can see the Key position, Its not exactly on the number. we can 'Snap' those keys to keep it in the right position. So for Snapping...


just simply select those key frames again and right click and say 'snap'.


Now you can see the keyframes are snaped in the number.

Lesson 7 - Utilizing the key tool to generate keys

Utilizing the key tool to generate keys


In this, we are using the same movement what we used on the Previous lesson (lesson-6), the only thing here is we removed the inbetween. So the First and Last movemtent is there and we have to add inbetween.


what it does is 'All Manipulator Handles and Keyable Attributes'. If you press 'S' key on the keyboard or 'Apply' on the Set key options. It basically takes everything (all the attribute) and set a Key based on that.


As soon as you turned on 'All Keyable Attributes', you can see the below section on the options is turned on..


Hierarchy


Selected: It select only that object.


Below: is set Keys on all child objects of your selected object


Channels


All keyable: set keys on all of our attribute


Control points: you can also set keys on control points on your object


Shapes: Any Attributes on shape note


From Channel Box: You can specify what keys you want to set by whatever we set on the channel box


this option used for:


'Shift W' - Key the 'Translate' Attribute


'Shift E' - for 'Rotation' Attribute


'Shift R' - for 'Scale' Attributes


'Current Manipulator Handle'


Current time


Suppose when you adjust the 'Z' handle on the Scale tool, and apply. It automatically update on the Channel box.


so We will keep these settings and continue further


-'All Keyable Attributes


-Set keys at: Prompt


-Hierarchy: Selected


-Channels: From Channel Box


and Apply.


Notice there's a 'pop up' box opens, 'Set Key'. It basically tells like where to set the keys.


Ex: Our animation from Frame 1 and frame 30, the translate Y are set to '0', so that we can get the arc when we move upward 'translate Y' on Frame 15.


So knowing that, we want to maintain the value of '0' for our 'translate Y' for frme 1 and 30.


what we can do here is, on the dialogue box type 1, 30. It takes the Same value of the translate Y and basically duplicate them on the frames we have specified on this dialogue window.


now we hit 'OK'.


The key has been set on 'Translate Y'.


Notice, if we bring the cursor to frame 15 and move the ship upward.. and hit Play.


Notice that we able to get the arc, from frame 1 to frame 30.

Lesson 6 - Speeding up the key frame process with Auto-key

Auto Key
Automatically generate keys, based on the attribute modified. Before you Make the Autokey work we have set the Key initially.


Once you turn on the 'Auto key' in the 'preference box', the right hand bottom Key icon switch on to 'red'.


You can manually turn on the 'Auto Key' by pressing the button on the right hand side corner.

Note: We have Set the Key first to activate the auto key

Before you begin, select your attribute which axis you want to move. here you can see Translate Y, Translate Z, Rotate X are Keyed ('Key Slected')


Now we set the Keys for all three Attributes .


Rotate the ship in the upward by typing the number on the 'rotate X' box, or select the 'rotate X'(letter) and drag the mouse horizontal in the work space to change the number. And the key will automatically set.


First move the cursor to the Frame 30, and move the ship to the 'C' position, and you can see the key will automatically set.


And it only animating the channels that we set the keys.


Rotate the ship on the X axis below, and the key will automatically set.


Notice the movement of the ship from frame 1 to frame 30, if u want to change any movement on frame 1 or 30, you can adjust and it will automatically take that as a key.


Move the cursor to Frame 15 and move the ship close to 'B' (blue box)and the you can see the key will automatically set.