Lesson 23 - Exploring the Graph Editor Toolbar

Go to
Windows >
Animation Editors >
Graph Editor.

The
Graph Editor Window.

The
Graph Editor Descriptions.
 1. Move Nearest Picked Key:
 It allows to position of our keys as well as our
tangent handles very quickly.
select the
keys which you want to move.

click the '
Move Nearest picked key tool' and move, by hold the
tangent handle.

You can move the f-curves freely by using this '
Move Nearest Picked key tool'.
Notice your selection of the keys remain the same. Wherever you keep the mouse cursor
and move, only that particular key we are able to
move freely.
 2. Insert Key Tool:
 It helps to adding keys while still maintaining the continuity in the F-Curve.
Lets say we focus on
Translate Z here.

Lets say we want to
add a key on
Frame 11, Click '
Insert Key tool' and..

use the '
Middle mouse' button click on the
F-curve to get the key.

If we go back to all the
F-Curve and see, Notice it does'nt
add keyframe to all the curves. It just add the keys to what we
specify in our selection.

You can
Add as many keys you
like to.
and you can even..
 Select
 all of the
curves and click where you want the keys, Notice it
generate keys on all the
selected curves. 3. Add Key tool:
 It similarly works like a
insert key tool, only with the add key it will allows us to add a key while
maintaining our default In and Out tangency.
If we goahead and
click on the selected curve notice we get a
flat tangency.
 4. Lattice Deform Key:
 It helps to
tweek the animation by giving you a 'scaling box' around the selection.
Select a
bunch of keys.

click on the '
Lattice Deform' Key to bring the 'Scaling box' around the
selected area.

You can
scale out keys '
proportionally' based on how we move these circles in the corner of the box.
rather than going to the circles..

you can also going inside the boxes and move around.
 5-6 stats:
 Time / Value.
lets concentrate
translate Z here, and say we
multiply its position by 'time'.

The position on the key is on frame 21 and we are going to multipy by 2 so that means on the stats bar '*=2'
(Multiply, Equal, 2), Notice the key is shifted to 42.

Lets do the same thing for out
value, but here instead of adding we are going to
subtract.
 7. Frame All:
 It Frames the 'Whole F-curves' in the
Graph editor.
 8. Frame Playback Range:
 It will set the
graph editor view into the
playback range what we have selected.
 9-10-11-12-13 Tangent Tools:
 Spline, Linear, Clamped, Stepped, Flat Tangents.
 14. Buffer curves Snapshot:
 It allows to take a 'snapshot'.
Lets select
translate Z here and..

Go to
View >
Show Buffer Curves, and Move the key below. Notice the
snapshot appears (b).

and if you want to take the snapshot of 'A' position click on '
Buffer Curve Snapshot'
NOTE: you can make only
one snapshot at a time.
 15. Swap Buffer Curves:
 It allows to
Swap curve.
Here we have 'A' and 'B', 'A' is the
original curve and 'B' is the
snapshot.

Click on the '
Swap Buffer Curve' to swap the 'curve' between our keys.
 16. Break Tangent:
 Select the key to
break the
tangent handle, once you have selected click on the '
Break Tangents' you can see the
color change in the handle.
 17. Unify Tangents:
 If you want to move the handles evenly, then click on '
Unify Tangents'.
 18. Free Tangent weight:
 Select the
key and Go to
Curves >
Weighted Tangents.

You can see the Different in the
handle, the handle
'size' will change according to the curve. Click on '
Free Tangent Weight', and then you can
stretch or
squash the handle.
 19. Lock Tangent:
 Once you are
done with the adjustments, click on '
Lock Tangent' to
lock its position. Once the position is locked you can move the handle
proportionally.

And you can go to
Curve >
Non-Weighted Tangents, to bring back the handle to its
original position. 20. Auto Load Graphic Editor On/Off:
 click on the icon to
Auto load.
21. Load Graph Editor from Selection: Click on the icon to
Load.
 22. Time Snap On/Off:
 you can click on the icon to
snap it On or Off the time.
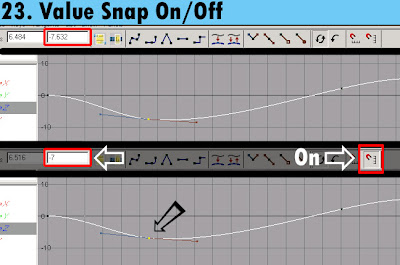 23. Value Snap On/Off:
 you can click on the icon to
Snap it On or Off the value.


 Pre Infinity: Which allows to cycle before and


