The Animation.

Select the Object (Cylinder), Go to Animate > Ghost Selected (Option Box).

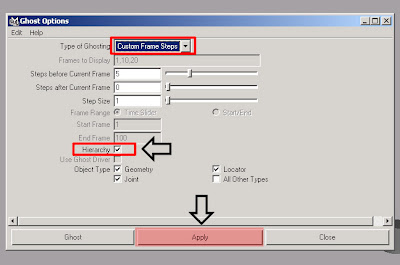
'Ghost Options' Box.

The Default value is set to 'Global Preferences' and hit 'APPLY'.

What we see here is a multiple cylinders in our view port, only our main cylinder is able to select. The others are the visual representation of our timing.

Custom Frames: It allows to set the custom amount of frames which we like to ghost.

We don't have any Cylinders following us but we do have some on frame 1, 10, and 20 what we specified from our option, it doesn't move along with the main cylinder if you 'play'.
The Result.

Custom Frame Steps: Its basically the same as the 'Global Preferences', Only with this we can customise and tell how many cylinders we like to see as well as its spacing per frame.

The Result.

Custom Key Steps: It does the same thing as 'Custom frame steps' except we are able to see per key.

Keyframes:
Frame Range: which allows us to adjust from our Timeslider and start and end time.

Notice we are able to see all of our keys from the frames on our timeslider.
and the same way start/end time works.
Lets go back to 'Custom Frame steps'..

Hierarchy: It ghost not only the selected object but the object within our hierarchy, so the children object, and underneath we can specify what 'Object type' we would like Geometry,Locator,Joint,All other types.

now lets say we want to unghost.
First select our Object, go to Animate > Unghost Selected (Option Box).

'Unghost Options' Box.

Notice by default the Hierarchy is set to 'OFF', now turn it 'ON' and click 'APPLY', Notice the ghost objects are gone.

No comments:
Post a Comment